Using The Gradient Tool In Design
The Gradient tool is one of the most powerful and versatile tools in Adobe Illustrator, with its ability to make vector objects look more 3D.
We've been talking about the flat design trend recently, however the gradient tool is the key to mastering its opposite: skeumorphism. This tutorial will show you how to use the gradient tool's most basic capabilities to make a sleek 3D app button.

Tutorial Details
- Program: Adobe Illustrator CS6
- Difficulty: Beginner

This icon may look complex but it's just 4 layers of basic shapes, filled with simple gradients!
1. Open a new document

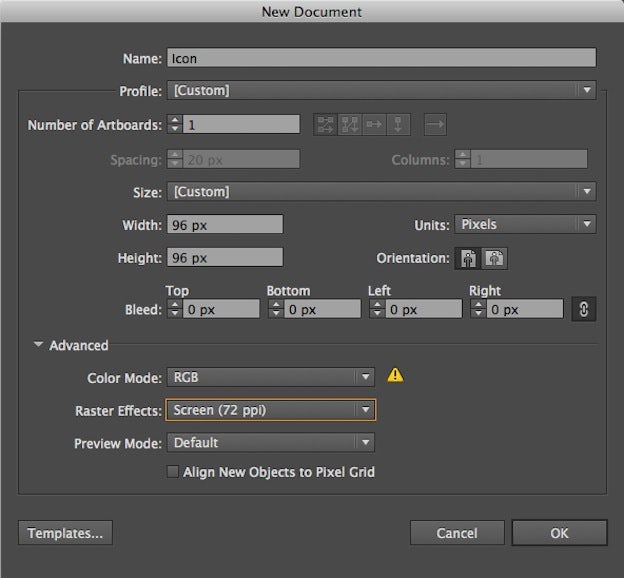
First, click File > New, set the units to Pixels, the Color Mode to RGB (because icons are displayed on a screen) and the Raster Effects to Screen (72 ppi).
2. Locate the Gradient tool
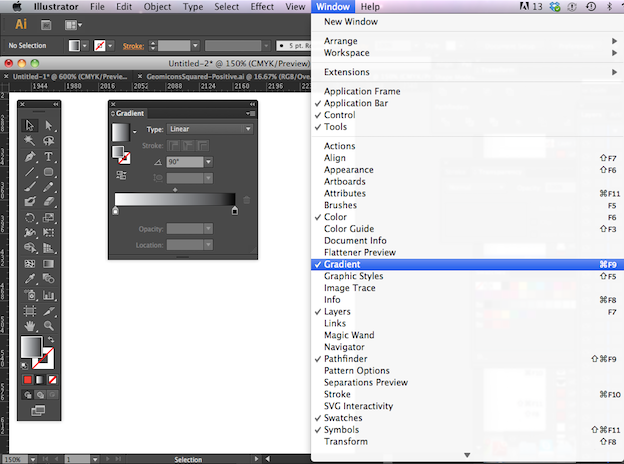
Let's get familiar with the location of the gradient tool in Adobe Illustrator. The gradient tool can be found by clicking Window > Gradient. It can also be found in the default tool bar and will appear as its own small window in the default workspace.
3. Make some vector shapes

Start by making some closed vector shapes to fill with gradients. Here, I've created some vector shapes that are going to make up my Drop Bear button design.
4. Apply a linear gradient
In the Gradient window there is a Type drop down menu with 2 options: Linear and Radial.
Those are the 2 main kinds of gradients. If you master just these 2, you're going to be able to do A LOT of different things with them. I'm going to start by filling my rounded square with a Linear gradient.

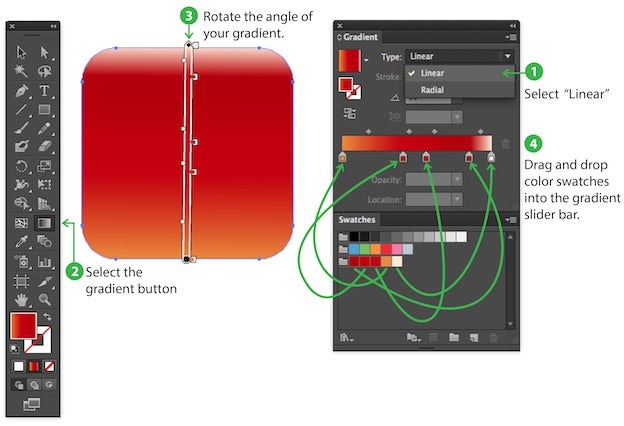
- Select your shape, then from the drop-down menu that reads Type, select Linear.
- Select the gradient button.
- Rotate the angle of your gradient by hovering your mouse over the diamond-shaped symbol until your cursor turns into the rotation icon, then drag clockwise or counterclockwise.
- Drag and drop the desired color swatches into the gradient slider bar. Both the gradient slider over your shape and the one in the gradient window will match each other, and the gradient you create will appear in your shape.
Throughout these steps, you can still make adjustments to your gradient. Dragging the circle end of the slider bar around changes the origin of the gradient. Dragging on the diamond end of the bar will increase the length of the gradient. Now you've made a Linear gradient, let's make a Radial gradient.
5. Apply a radial gradient

- Select your shape, then from the drop-down menu that reads Type, select Radial.
- Select the gradient button.
- As needed, adjust the origin, size and shape of your gradient by dragging on the circle, diamond and dot symbols within the gradient bounding area.
- Drag and drop the desired color swatches into the gradient slider bar.
After these steps you'll have a radial gradient applied to the Drop Bear's face, giving it more dimension. I also added more gradients to the outlines around the bear, using the same simple radial and linear gradients. Now that you've applied some gradients, lets put these shapes together, then we'll have our evil drop bear button!

Knowing even the most basic capabilities of the gradient tool will allow you to create polished-looking designs. Once you've mastered its basics, the gradient tool can become a powerful and versatile way to create designs that really pop.
How do you use the gradient tool in your design work?
Using The Gradient Tool In Design
Source: https://99designs.com/blog/design-tutorials/gradient-tutorial/
Posted by: albanesethenteavill.blogspot.com


0 Response to "Using The Gradient Tool In Design"
Post a Comment